


Introduction
ASPNET Core is a cross platform open source project from Microsoft, It is a modern web development framework that simplifies building powerful websites and web applications.
ASPNET Core is released in 2016, when Microsoft introduced .NET Core which is designed to be more modular, cross-platform compatible, and open-source from the ground up. From then on it’s evolving rapidly and we are getting a release every year and recently (November, 2023) ASP.NET Core 8 came out along with .NET 8.
If you come from a .NET background, In the early days we used to write/have a lot of code to wire up a ASP.NET app, But now it’s just a single Program.cs file where we couldn’t even see the main method. A lot has changed and all the wiring up part has been abstracted out from us and provided as extension methods which we can configure as required.
If we create Empty Web App in NET 8.0, we see below project project Structure:
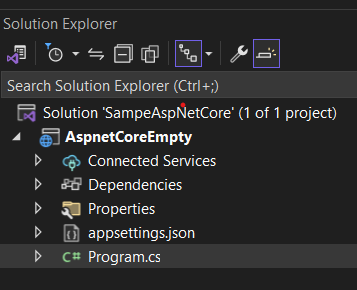
Now, if we open the Program.cs file we only see the below 4 lines of code which is spinning up a new Website if you run it.
 var builder = WebApplication.CreateBuilder(args);
 var app = builder.Build();

 app.MapGet("/", () => "Hello World!");

 app.Run();
If we want to understand the code about what’s really happening internally, There are two options.
You can disable Just My Code in Visual studio Settings and enable to Load Symbols, where visual studio will get the PDB file and helps you debug the external code, Since that code is already compiled, the compiler would have done some optimizations on it, it will not be the same as original, If you want to debug at high level at most times this will work out.
Get the actual source code from GitHub and add it as a dependency to your project, then we can debug into the project
So now let us understand how we can get ASPNET Core source code and build it locally so that we can add the projects inside it as a dependency into your own projects and debug the ASPNET Core internals. Also going through opensource code helps a lot in understanding how others are writing code and understand best coding practices and security practices to follow.
Prerequisites
Before going forward, we need some tools to install first —
The dependencies/tools we need are Git, Visual Studio Preview(will be installed later) and Node.JS (optional for some components) , and account in Github.com (if not already there).
You can download Git from https://git-scm.com/downloads
If you don’t want the complexity of setting up the git, and If you already have visual studio installed, then
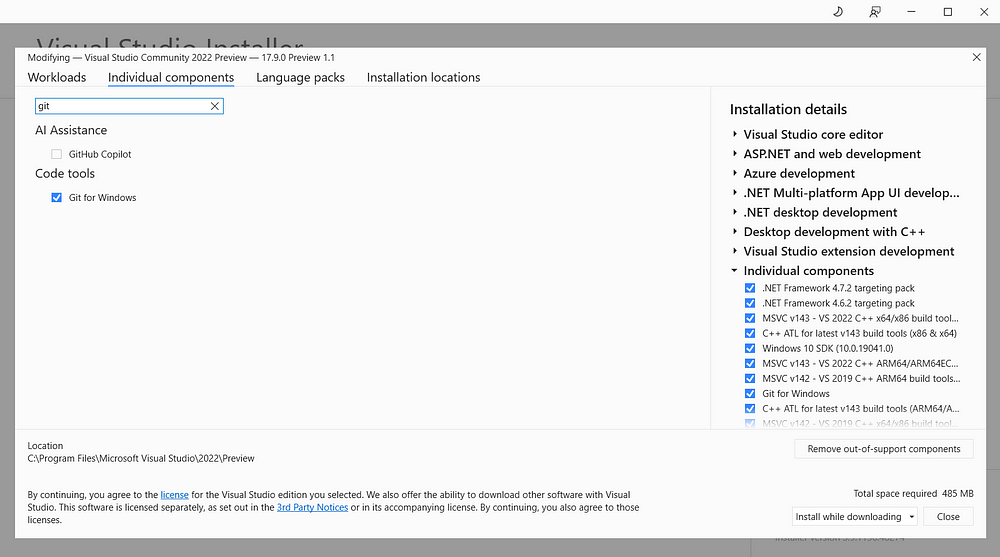
Open Visual Studio Installer > Click on Modify > Go Individual Components tab (next to workload tab) > Search for Git and Select Git for Windows checkbox. Then proceed to install, visual studio will automatically install the git and setup everything for you.
Next we will install Node JS, As of writing this post the aspnet core source code is only building with Node JS 18.19.0 and some other lower versions. The latest LTS 20.10.0 version is not working to build the project (this may be not the case in the future).
So you can download the installer from https://nodejs.org/download/release/v18.19.0/ and install Node JS.
Setting Up the Environment
Firstly go to ASPNET Core GitHub Source code repository (https://github.com/dotnet/aspnetcore)
Click on the Fork button at the top right of the page. Sign in to your GitHub account, to continue forking the repository to your local repository.
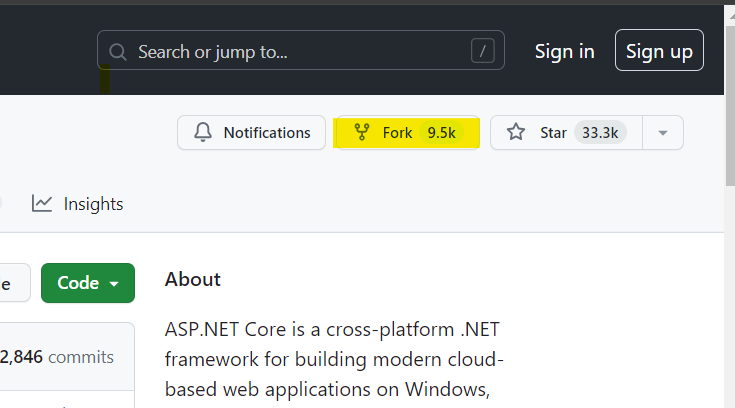
Fork ASP.NET Core Repository
We can also directly clone the repo, but forking the repo is best practice and you can easily contribute back to the original repo.
Now once the repo is cloned click on the Code Button and copy the URL link (https://github.com/YOUR_USERNAME/aspnetcore.git)
Now open a terminal in your system and follow below steps —
git --version

Make sure the git is properly installed, if the above command gives you an error then git is properly not installed. Next we will clone aspnetcore repo.
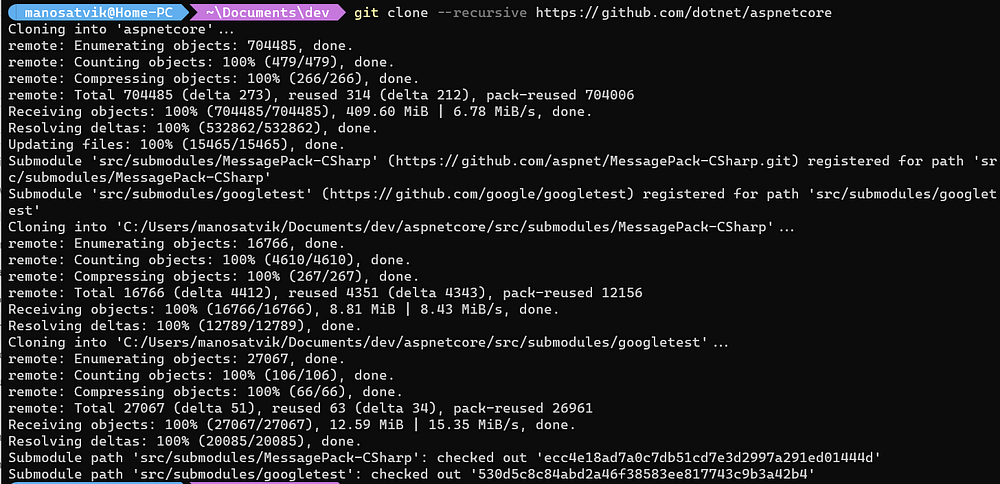
git clone --recursive https://github.com/YOUR_USERNAME/aspnetcore
Now, switch to the aspnet core directory, inside that folder you will see all the source code for aspnet core project, By Default you would be in the main branch, which has the recent latest code. You always want to work with a specific version of ASPNET Core like v8.0.0. You can get the code for a particular release using the correct tag (here in this case v8.0.0 for ASPNET Core 8). If you cloned using a forked repository, then the tags will not be pulled by default, we have to pull them separately. To get the tags follow the below steps —
git fetch --tags https://github.com/dotnet/aspnetcore.git

git push --tags

Here the first command will fetch tags from aspnet core repository and pulls them to your local repo. The Second command will push the tags from your local to your forked repository. It’s fine if you see some errors related to the Submodule, Next we will check out a branch from a particular tag (in this case v8.0.0).
git checkout tags/v8.0.0 -b aspnetcorev8

Set-ExecutionPolicy -ExecutionPolicy RemoteSigned -Scope CurrentUser
Now, set the execution policy to run Remote Signed scripts in PowerShell.
./eng/scripts/InstallVisualStudio.ps1 Community Preview
Now, run the above PowerShell script to install visual studio (Change Community to Enterprise or Professional based on your license). It will install required components for the project to run. The above command will download Visual studio installer and you need to install the visual studio. Please don’t unselect any default components select by installer as they are required to build the repository.
Build Process Walkthrough
Till Now, we have setup the code in our Local system, Now we will go through the build process.
First we should run the restore command
.\restore.cmd

The restore will take good amount of time for the first time since it needs download required dependencies and install it.
Now we can build our aspnet core repository, but building the entire aspnet core repository is not recommended (It will take a lot of time or we need a beefy machine), since we rarely will need the entire project. Recommended approach is to navigate to the required component and build it.
For now let’s understand how to build the MVC component. Let’s navigate to src/Mvc folder.


In the aspnet core source code we have AspNetCore.sln where all the projects are there, We have multiple components of AspNetCore in the src folder and for each component we will have solution filter, where it only loads the required/dependent projects for that component. So we can load the component we want to understand.
Conclusion
We understood about what is AspNetCore and went through options to debug aspnet core source code, We went through tools required for debugging aspnetcore source code and how to install them and finally we cloned the aspnetcore repository and understood how to build it.
In my next post, I will summarize about how to Debug the internals of an empty ASPNET project by linking the aspnet core projects instead of preinstalled framework dlls. Stay Tuned!
Happy Coding!
References —
aspnetcore/docs/BuildFromSource.md at main · dotnet/aspnetcoreASP.NET Core is a cross-platform .NET framework for building modern cloud-based web applications on Windows, Mac, or…github.com
https://github.com/dotnet/aspnetcore/blob/main/docs/BuildErrors.md